

| home | graphics | blade pro | links | nuts & bolts | portfolio | sitemap |
|
|
|||||||
|
|||||||
| Interfaces Tutorial for Paint Shop Pro Users |
|
Creating an interface can be tricky, frustrating, and challenging. In fact, it probably will be all of the above! But when it works, it's worth all the hard work, the blood, sweat, and tears, that went into it. Frankly, I wouldn't advise this project for a beginner and these instructions are based on the user having a strong familiarity with Paint Shop Pro. There are several techniques and tools you need to gather together before tackling an interface: know how to use the layers feature of PSP, use the alpha channel as much as possible, get a good beveling filter such as Alien Skin's Eye Candy, or if you can't afford it, Flaming Pear's Blade Pro is an excellent substitute (Some will prefer the versatility and diversity of BP to EC, regardless of price.), and Lonewolf's Javascript Buttons III. First and foremost, be very comfortable with the concept and usage of layers. When I create an interface, every element of the piece goes on a different layer. That way, if I don't like an effect or the way the buttons look, I can just delete the layer and plug in a new one. Second, using the alpha channel to save your selections can be invaluable help. There are times you need to reselect a certain portion of the graphic for some fine tuning, but PSP's magic wand does not do antialiasing, so you start getting the jaggies. If you save your selection to the alpha channel, you can readily call a selection up and use it on any layer. All the antialiasing is there--if you had it in the original selection. Third, a good beveling filter, while not necessary at all to create a fantastic looking 'face, really gives the final product a finished, 3-D look. Eye Candy does an excellent job and usually adds a wonderful lustrous finish to the piece. Blade Pro can add beveling as well as wonderful, zany, colorful textures. I frequently use a combination of both filters. Lonewolf's Javascript Button III is the only thing that saved me from insanity while making 'faces. Find it and get it. He's very generously offering it for free. There are several major steps to making an interface.
The first three steps are inter-related. When you're designing your 'face, you have to keep in mind how the dicing and table coding are accomplished. To that end, I'll start with the table coding first so you'll know how to design your 'face. PLACING YOUR DICED GRAPHICS INTO A TABLE. When you cut up your picture into pieces, each of those pieces is placed into a cell of an HTML table. Because of the mouseover effects, your buttons and screen need to fit wholly into individual cells. By that, I mean, each button has to have its own cell in a table. The screen has to be in its own cell. Keep in mind that the screens are usually substantially larger than the buttons. Not to worry, there are neat HTML tags called rowspan and colspan. These will let you expand a graphic beyond a single cell. Confused yet? Okay, think of a table as a grid. You have a certain number of cells going across, and a certain number going down. Using the rowspan or colspan tags, you can make a larger graphic use several cells. So, with this in mind, try to keep your buttons lined so they will easily fit into the grid without overlapping cells. If you can't keep them aligned, there is still hope, but let's take the easy road first. Okay, you've thought about your design, constructed the graphic and now you're ready to cut it into pieces. There are a couple avenues you can take. First, download Shoestring Picture Dicer or Slicer Dicer or Ulead's Smart Saver Pro. I've never used any of them so I can't speak to their efficacy. I know that Picture Dicer cuts all the way through a graphic, from one side to the other--which you may not necessarily want to happen. Keep that in mind, also, as you design your graphic, if you decide to take that route. I cut all my pieces manually, in PSP, which I feel gives me more control and freedom, albeit, it does take longer. DICING THE GRAPHIC. After I've made my graphic, which includes the off and on buttons, the last layer I add to the graphic is the layer on which I draw colored cutting lines. This ensures all my pieces will line up correctly and I will be cutting at the right places. If my graphic is complex enough (i.e., lots of little filler pieces), I also label each of the cells on my cutting layer with the name I plan to give the individual piece. (I use very simple names like f1, f4, f24, etc.) This gives me a finished piece to refer to as I'm putting it together again in the HTML table. Another benefit I find to placing cutting lines is that with PSP, when I use the rectangle selector tool and put the marquee over a cutting line, the color of the line changes and I can see if I've selected absolutely correctly. Before I dice a picture, I make a copy of the whole graphic--with the layers UNMERGED. I save it as the ON graphic in PSP format, and then uncheck the visibility of those layers that do not pertain to the ON buttons. I also uncheck the visibility of the cutting lines layer. (See Figure 1.) With all the extraneous layers not visible, I merge (MERGE VISIBLE**) the rest. With all the good layers merged, I then check the visibility of the cutting lines layer so I can see the lines, but make the merged layer the active one. (See Figure 2.) Then I start cutting away. I draw the marquee of the selection tool exactly over the cutting lines and when they change color, I know I have the exact selection. I use the keyboard to copy and paste-as-new-image (ctrl-c and ctrl-v). 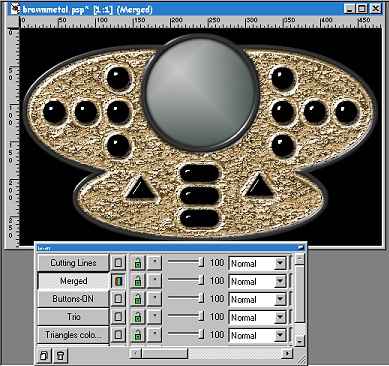 Figure 1 Notice the cutting lines layer is not visible  Figure 2 Notice the layers are merged and the cutting lines are visible. Also note the Merged layer is the active layer. When I've finished with the ON graphic, I take the original and make a copy of it, saving it in PSP format as the OFF graphic. (Remember, you have as many ON screens as you have buttons and one OFF screen--the screen that is seen when no buttons are active.) Again, I uncheck the layers I don't want in the final merge, including the cutting lines layer. Then I merge (MERGE VISIBLE**) the visible layers. Then, I make the cutting lines layer visible and make the merged layer the active layer, as in Figure 3. On this graphic, I only cut out the buttons, because those are the only things that changed from the ON graphic. I usually name my buttons what I intend to label them in the working 'face, for example, the button that I'll have as "Home" will be labeled home-off.jpg or home-on.jpg. (Keep in mind, on most of my 'faces, the buttons are unlabeled and you do need the mouseover effect to show what the button does. For that reason, I also make sure to fill in the "alt" info in the HTML code.) One other thing I do is to make sure I save the screen section in .psp format, because I will use that to customize the screens to agree with the corresponding buttons. ** There are two kinds of merging. MERGE VISIBLE, which merges only the layers whose visibility are checked, and MERGE ALL (Flatten), which merges all layers. 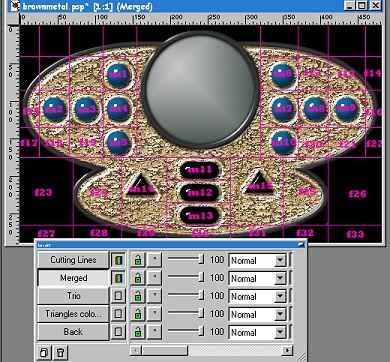 Figure 3 ON graphic. Merged layer active, cutting lines visible PUTTING IT ALL TOGETHER. Once I have all the pieces together, I go to my HTML editor (I use Homesite. It's very intuitive and has several "wizards" to make some functions easier to do. There is a table wizard that makes tables a snap, but I'll walk you through the long way.) A table consists of several tags such as the main one, <table>, which goes at the beginning of the whole shebang, and </table>, which goes at the end. These are the opening and closing table tags. Inside that is the <tr></tr> tags, which go at the beginning and end of each row of the grid. Inside that is the <td></td> tags which represent each cell in each row. There are a few properties you want to change inside the table tag. First, be sure to add the following to each "table" tag: <table cellpadding="0" cellspacing="0" border="0">If the cellpadding, cellspacing, or border tags are left off or are greater than zero, spaces may appear between your pieces with different browsers. At this time, you can also add background color or graphics if you want. So, your empty table will look similar to the following: <table cellpadding ="0" cellspacing="0" border="0"><tr> <td rowspan="2"></td> <td></td> </tr> <tr> <td></td> </tr> </table> The "tr" and "td" tags will continue as much as you need them to for all your pieces. The rowspan and/or colspan tags fit within the "td" tags ONLY. Some people feel that having each of the tags on it's own line will cause spaces to show up between the pieces, but I haven't seen that happen. If you have your table set up as above and you're still seeing spaces between the pieces of your graphics, try putting all the tags on a single line, without any spaces or linebreaks. If you can't possibly get all the buttons and stuff lined up to easily fit in a single table, no problem, just add another table, set up the same way, directly below the first one and continue with your graphic placement in the cells. If you'll notice in the above interface, the area containing the blue buttons would be in one table, but the area with the black buttons would be in another table. If you look carefully, you can see that there is no way to get all those in a single table, because the buttons just don't line up. One last tip about the HTML code: Be sure to fill in the height and width tags for each piece of your graphic, especially the buttons. There are a couple reasons for this:
ADDING THE JAVASCRIPT. Lonewolf's Javascript Buttons II and III really do make scripting rollover buttons a breeze. There are a couple tricks to using it. First, you must have an HTML page in the same directory as the pieces you're scripting. You're not allowed to change directories to select a new html page. For that reason, I always have a dummy HTML page in my directory and then when I'm fine tuning the HTML page, I change the links to the right pages. Second, remember to put your blank screen name in the area in the lower middle field.  Figure 4 Lonewolf's Javascript Generator The program was well thought out, but it's not always self-evident how to use it. To make the code, you select your files from the lower left file listing. So, for a three-graphic mouseover (i.e., off button, on button and screen change), here is the order of the files you click on:
After that fourth selection, the program puts a line in the list (1a above). Then click on the field at the bottom of that middle window and put in the name of the Off screen--this is a one-time step (1b above). Then continue with the next set of buttons until you've selected them all. Then click on the TEST (1e above) button and the program will bring up a browser window with your buttons and screen and you can test the mouseovers to make sure you chose the right ones. (The test screen will NOT look like your finished 'face. It's merely a way to check that you've made the right pairings.) If you made an error in pairing your buttons with screens, you have to delete all entries from the bottom up to the point of your error, make the correction then regenerate the entries you deleted. If your buttons all operate correctly, click on the GENERATE (Figure 1c above) button and you'll see your code being generated. When it's finished, click on the OK button at the bottom of that window. This takes you back to the main window. Click on SAVE (Figure 1d above) and save your script. It's saved in .txt format and can be viewed by HTML editors as well as text editors. 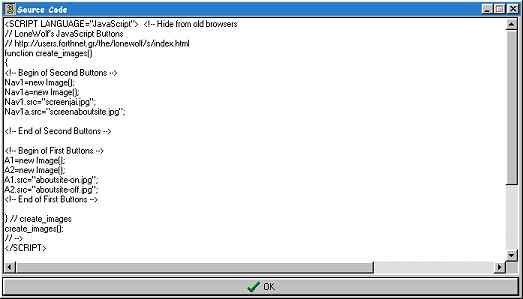 Figure 5 Source code generated by clicking on the GENERATE button. Top part for header portion I then open my HTML Editor and open the page where I have my table, then I open the script. I highlight the top part of the script page, between the <script></script> tags and copy and paste that into my HTML document between the <header></header> tags. Next, I find the table with my graphics and locate the first button. I delete the <img src="xxxxx"> information about my first button. 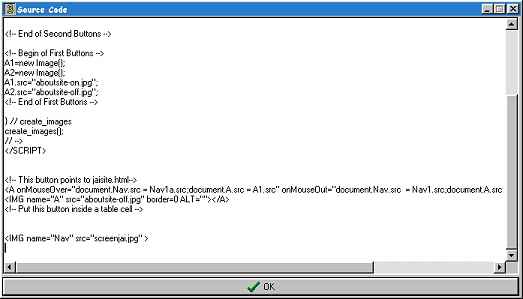 Figure 6 Button script lower portion Then I go to the first button on the script page and copy and paste that into the cell where the first button was. I do that for all my buttons. (Reminder: remember to put in the height and width tags. The javascript does not have that info.) At the very bottom of the script page is a reference to an image name=Nav. Find your screen graphic and type in the following--be sure to keep it case sensitive. Where it says <img src="blah, blah, blah"> right after the img tag, type in name="Nav" It should look something like this: <img name="Nav" src="myoffscreen.jpg"> If you leave the name="Nav" out, your screen will not work properly. Also, be sure to correct all the page links from the link you chose when you were creating the javascript to what it's really supposed to link. It should be working perfectly. First time, every time!!! |
![]() ...Back...
...Back... ![]()
|
|||||||